Deadline PDG Wedges: Houdini + Axiom

A quick guide on how to setup a TOPnet to automate simulation variations for an Axiom solver with deadline. This has been a core part of my simulation workflow for the past 6 months.


Special thanks to Taylor Petrick for his forum post regarding automating the overlay text attributes.

This was built using Houdini 20.5.410 + Axiom 3.3.068 + Deadline 10.4.0.1.

Rolling Ground Fog: Houdini + Axiom

A colleague wanted to know a good way to simulate a rolling fog in Houdini, so I thought up this approach with the GPU solver Axiom! Simulations often take less than 5 minutes to run, and in the case of the 20 second hero simulation, under 20 minutes. Here is the tutorial and the gumroad link to the source files.

Gumroad Link

Parallax Interior Shader: Houdini + Octane

Three weeks ago I was working on city sequence when I ran into trouble getting parallax interiors to work correctly, so I took a break and came up with this workflow! In addition to a modified OSL script and project files, I created this companion tutorial.

Gumroad Link

This script is based on the original from Julius Ihle and several other contributors.

The building distribution method was thought up by Dominick Lange.

The included EXR Matte utility was built by Dave D.

A huge thank you to David Torno and Joan Charmant for helping with math and quirks of OSL in Octane.

Houdini Instancing - Octane Materials & Attributes

Note: This is the current workflow for Houdini 19.5.605 and Octane 2022.1.1. This may change in future releases.

overview

Geometry instancing allows you to reference the values/attributes of one model, and “duplicate” the asset with far less overhead, allowing for scenes with millions to billions of polygons, capable of being rendered on a consumer GPU. This of course comes with limitations and caveats.

For a holistic guide on instancing, Toadstorm has a brilliant write up:

An Even Longer-Winded Guide to Instancing in Houdini

accessing attributes for non instanced materials

Of course if you have a small scale scene, you could simply keep the geometry live, and your attributes will work without issue. With heavy scenes this becomes unwieldly fast, but for everything else, it should do the trick.

This example scene is basic, a grid of points with two random attributes, one vector, one float. A material is added after the copy to points. Note your attributes and primitive count, this is live geometry.

To tell Octane to prepare your attributes for use in your material, jump back to the OBJ context, and check your octane settings. Under Attributes, you should enter all you wish to use. For this example I’ll just be using the Cd attribute. Note: Attributes must be from points or vertices. Primitive and detail attributes will need to be promoted.

Next create your material, and add the color vertex attribute node. Enter your desired attribute and voilà! We now have the random color from the source points applied to our material. To do this with packed primitives, however, requires another method.

the instancing shader trick

At this time Octane does not support custom attributes on instances, but there is a way around this.

First ensure that you are converting your mesh into packed primitives, and enable “Packed Geo Instancing” in your OBJ octane settings. Confirm this by checking your data stream, and ensuring octane is not unpacking your primitives at render time.

You will also need to ensure your material is added before your copy to points, on the mesh itself.

Now for the material, you’ll need one or both of these files, included in your octane plugin installation:

rgb4k_map.ppm

alpha4k_map.ppm

In my case these were found here, but your path may differ:

C:\Users\[USER]\Documents\houdini19.5\Octane_2022.1.1.1_Houdini_19.5.605\tex

These texture assets will reference your Cd or alpha attributes. To use them, add a Texture Instance Color node, and add the file path. And that’s it! Same attributes as before, now applied on instances via a single material.

With some creativity, the color vector can be used as three float attributes, giving you a total of four.

Ideally custom attributes are supported better in future releases, but in the meantime, this should help give you shader variation without wasting too many resources.

Thanks for reading!

Houdini to Cinema 4D Particle Guide - Redshift

the problem

Sending particles to Cinema 4D from Houdini is fraught at the best of times. Thinking Particles is unreliable, slow, and complicated to configure. Importing Alembics as points is equally tricky, and attributes difficult to access. Caching particles as polygonal geometry is terribly inefficient, unwieldly, and a little silly.

The best method I’ve found is exporting via RS Proxies.

caveats

You won’t have access to the points themselves; deformers, cloners, will not work. Particle scale and type is locked to your Houdini setup. This solve works for manipulating shading only. Like with all RS Proxies, internal file paths are absolute and cannot be changed. Earlier builds of Redshift cannot open proxies generated by newer releases. Obviously this doesn’t work with other render engines, I hear ORBX is a possible Octane solve. Let’s get started!

the particles

For this example, I have a dead simple particle system. Velocity based on normal direction (generated with the polyframe SOP) and a noisy popforce + popdrag applied over time with the normalized age attribute @nage. Particles are locked to the collider (Floor) using a minpos function in a popwrangle after the velocity wrangle.

My random attributes are set before the popnet so values don’t jump about on particle death, for my purposes this is random enough. Take care setting @pscale. For this example 0.001 is my maximum value.

I like to keep my floats normalized, so post simulation I have an attribute remap SOP converting the age attribute to 0-1. I also opted to ditch integers and kept my id_variant attribute float too.

preparing attributes for export

Unlike typical Alembic exports, we gotta trick Redshift into saving the attributes we want access to for shading. To do this we build a “draft material”, simply linking our point attributes to anywhere on the shader. This is enough to tell Redshift to save the attributes for later.

From my experience, you must use RS Point Attribute to snag your attributes, otherwise it won’t work. Be sure to set your material type to point, instead of primitive. Crucially, you need to set the render material at the OBJ level.

Generally Cinema 4D and Houdini operate at vastly different scales, to get them to match I added two offset nodes. Position offset of 100x globally, and a wrangle for particle scale (@pscale = @pscale * 100;).

NOTE: While I haven’t run into an issue exporting color, Cinema 4D is generally real finicky about how it receives vectors. If you run into issues, check out Matt Tillman’s guide, to convert your vector attributes.

Onto the next step.

creating the redshift proxy

While in your object settings, head over to the Redshift OBJ tab, and enable particles. Leave the scale alone, we should only rely on our pscale attribute.

Next dive back into your geo network, and add a redshift proxy output SOP. You can do this with the ROP as well. If you want motion blur support, enable that and the Instance/Particles Blur checkbox. Be sure you still have your v attribute around for that. Finally, configure your output settings. Recommend either culling attributes before export or check Discard the Not Used Attributes.

That’s it! Now for Cinema 4D.

cinema import and shading

You should now have an .rs sequence to import. Create an RS Proxy object, and select the first file of your sequence. Check enable animation, detect frame range and set the framerate accordingly. You should see two things, a bounding box in the viewport, and your proxy material listed in the import. If you don’t, check the previous steps. Previewing the particles in the IPR in Houdini is a great way to debug if you run into issues. It should look identical in both Cinema and Houdini!

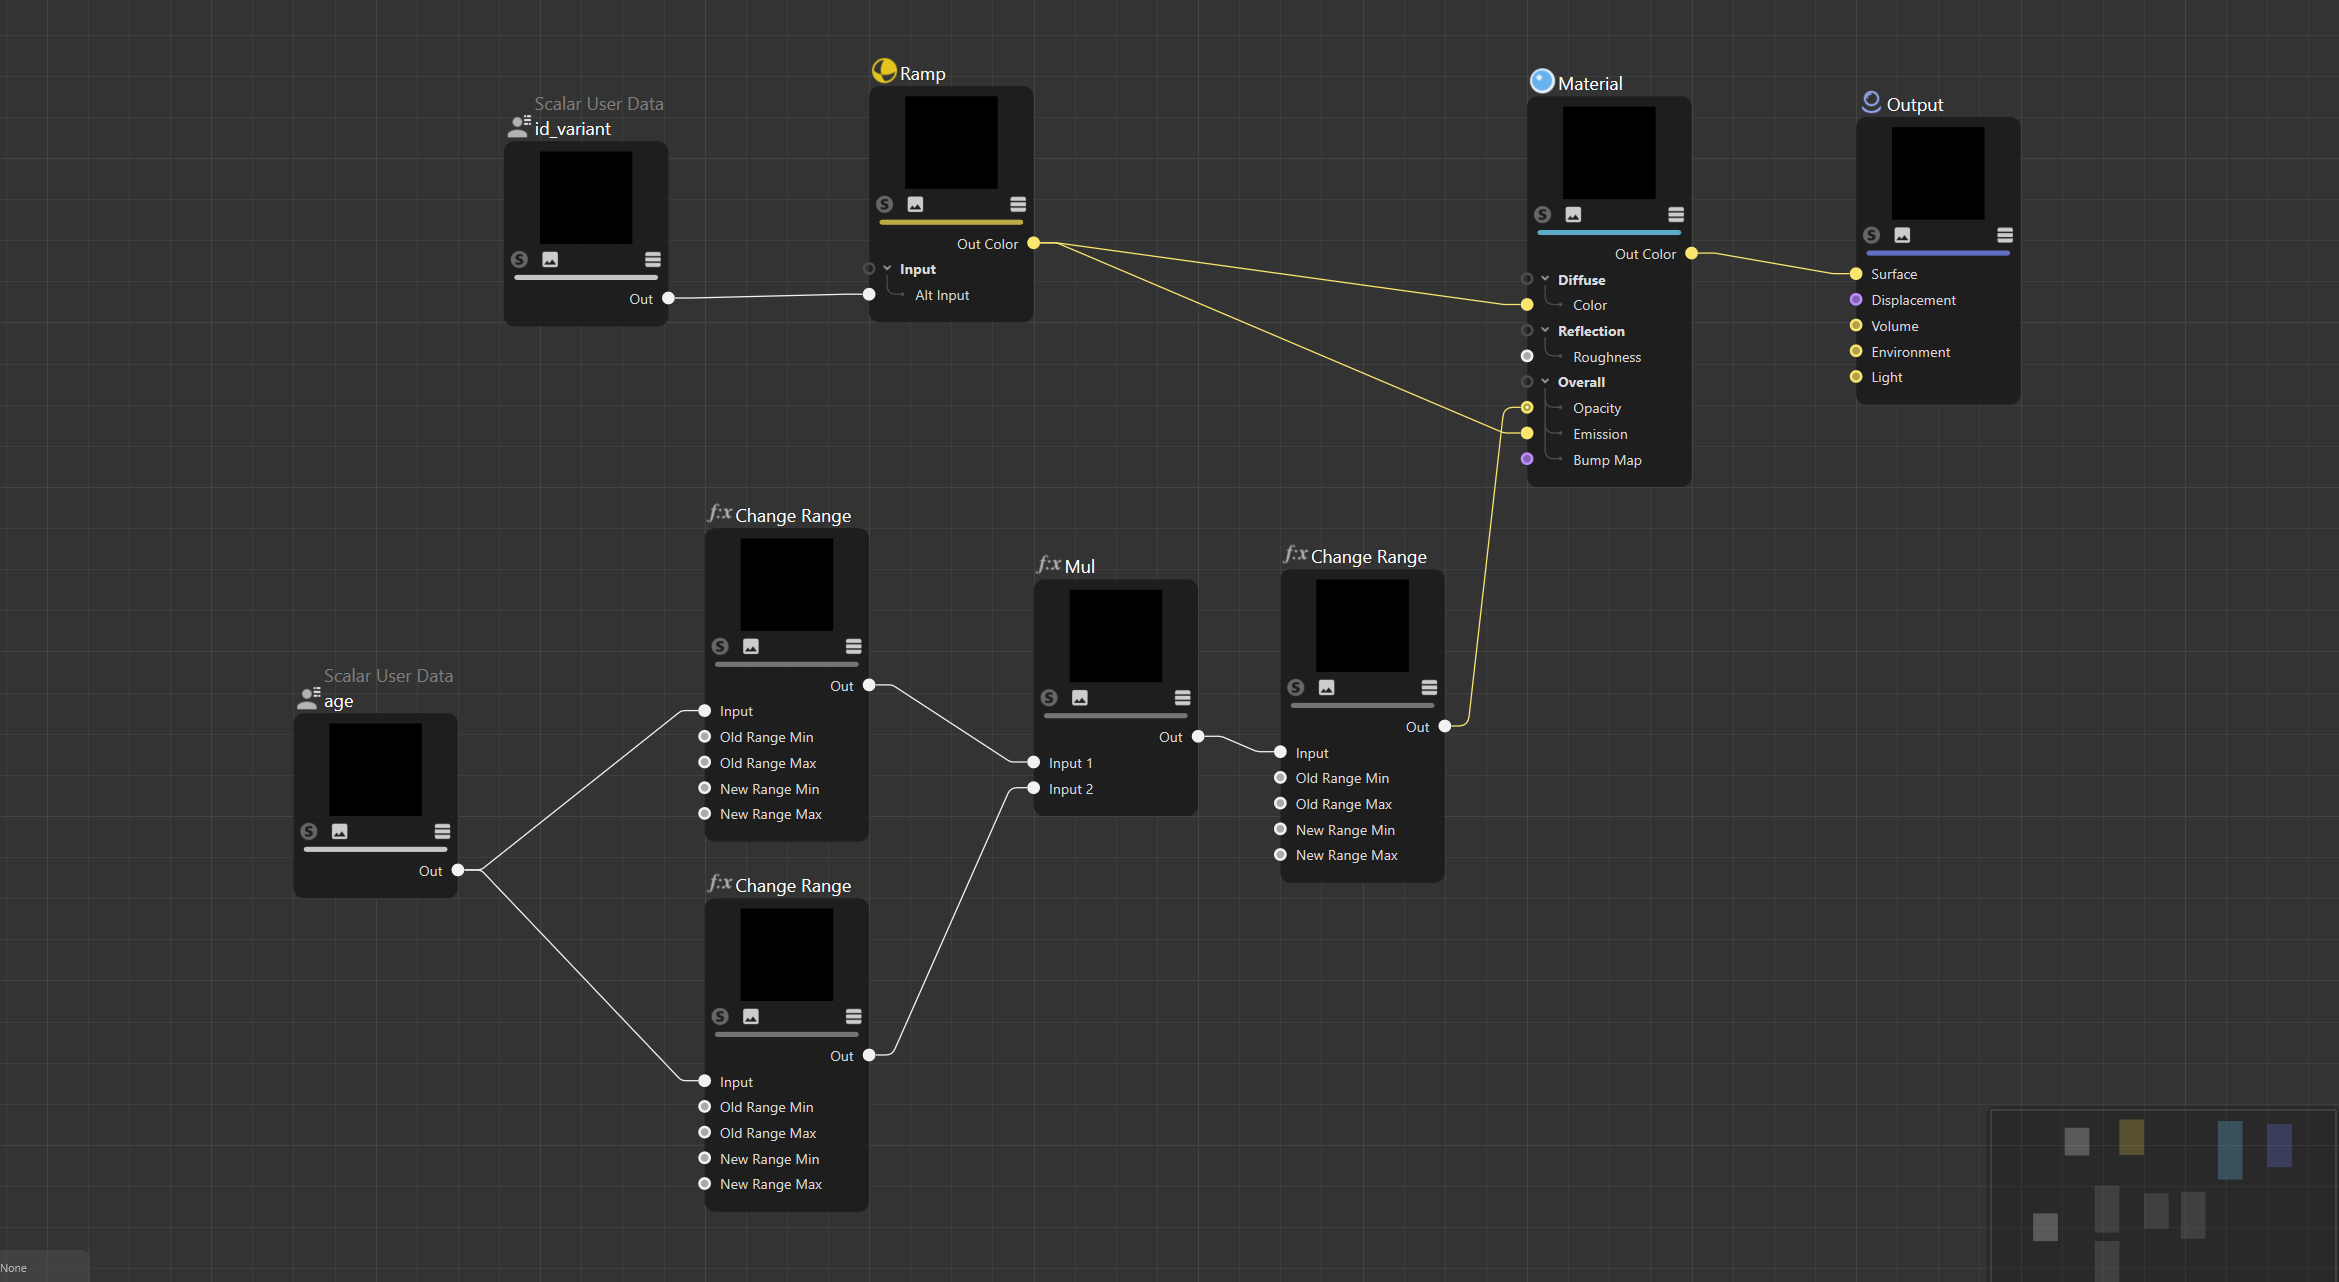
The fun part, change your material to object based and create a new material. You should now be able to reference our attributes with the User Data nodes (in my instance, scalar and color data). That’s it! You should now be able to shade your particles however you like. I used my id_variant and age attributes to create this quick render.

afterward

I hope this was helpful!

Running into this issue in the middle of production was maddening. Thank you so much Christopher Rutledge, Mark Fancher, Patrick Letourneau, Petru Carvaci, and David Torno for helping me troubleshoot and eventually settle on this solve. While I did eventually get Thinking Particles to kinda work, it just wasn’t worth the headache, quirks, and inconsistency. Highly highly recommend you stick with outputting proxies, or just light / render natively in Houdini. It’s pretty good at that, too.

Thank you and good luck!